
If there is one part of photography I absolutely love, it’s shooting after dark. Manipulating my shutter speeds and going after something that’s not so easily visible, is pretty yummy stuff. Watching the Perseid meteor shower recently had me screaming into the night air as I saw some of the of most spectacular meteors of my whole life. Anything to do with the night sky gets my juices going and reminds me why I wanted to be an astronaut since I was a little kid.
One of my favorite things to photograph with my longer shutter speeds, are star trails. Photographing stars trails is a whole different animal compared to shooting stars as points of light. With my camera on the tripod, I can set my shutter speed from 15 to 30 seconds, and most of the time, get pretty sharp shots of the star as points of light. Although, I have to set my ISO extremely high, the added noise is worth it when it helps create pretty spectacular stars in the sky.

Getting the Milky Way in my images whenever possible is something I love to do because it adds so much impact to many shots of the stars, as points of light, as in the image above. However, photographing stars as star trails across the sky is a whole different animal than stars as points of light.
In the old days of photographing star trails with film, you could leave your camera on a tripod with the shutter open pretty much all night long, and get amazing shots of star trails as the stars moved across the night sky. Back then, we didn’t have sensors in the camera that heated up and would over power our images with noise. But these days, shooting digitally, it’s a whole different ballgame. It’s possible to take longer exposures of the stars moving but the trade off of the added noise can be pretty intolerable. That’s why, usually, the longest exposure I take when doing star trails is about four minutes. But what I do, is shoot many exposures, which are a few minutes long, and then either stack them together or blend them together in Photoshop. That really is the key to doing powerful looking star trails when you’re shooting digitally. To do it the right way, you need to shoot multiple exposures and assemble them in Photoshop.
There are other key things to remember to make powerful star trails including a good foreground element if possible and also deciding which lens to use for the image. A good foreground element, even if it is a silhouette, often gives the image a balancing point of interest to go along with the powerful stars on top of the image. Much of the time when I am alone or with friends scouting out locations for star trails, our biggest concern is what will be in the foreground. We hunt all over the place for the perfect night sky and a great foreground element. Many times we can’t find the perfect foreground so we do the best that we can and we concentrate on the night sky. That’s when we have to decide which lens would be ideal for that situation.

In the photo above, I was scouting in Death Valley for an all night star trail shot and went to one of my favorite places around to shoot, the Stovepipe sand dunes. Although they are much better to shoot during the day, my friend Jennifer Wu and I wanted to try them as the foreground element for our all night shot. As we looked up at the sky, with Las Vegas glowing in the distance on the bottom right, I saw that Polaris, the North Star, was directly in front of us. This was perfect as I decided to shoot directly into the Northstar and have the star trails form perfect circles, around Polaris, for the shot. Although Jennifer used the battery grip on her Canon 5D Mark 2, which gave her an additional battery which she really wanted for even more exposures during the night, I opted not to use the additional battery grip. I knew that my one battery would give me at least 3 to 4 hours and that it would probably do the trick. We set our exposures with our Canon Intervalomters, to four minutes with a 1 second interval and no set number of exposures, meaning that it would fire off four minute exposures until the batteries died. I decided for this image to have a very wide field of view so I opted for my Canon 16 to 35mm F2 .8. I set my lens to 16mm and ISO 800 and a white balance of approx. 3700 degrees, after we both tested it out and found that this provided us with the best images to assemble later.
We left our cameras in the dark, clicking away, and went back to our hotels to go to sleep. When we returned in the dark, early in the morning, we realized we should have set a GPS point for our cameras because we could not find them for almost 40 minutes. That is something that will not happen again to us, that’s for sure. We went for breakfast, along with my girlfriend, and in the dining room while waiting to eat, I assembled the image in Photoshop, using the statistics script, which is in the Extended version of Photoshop. I could have used the blending modes on multiple layers in Photoshop, which would’ve done the same, but it would have taken much more time. The statistics script is like magic and takes all of your exposures at once and blends the stars together in one long exposure. It took my 64 four minute exposures, showing the stars moving a little bit in each shot and made it look like I had taken a four hour exposure.
I decided that the sand dunes was not the best graphical element for the foreground so I decided to use the plug-in, Flood, to create a surreal looking lake with reflections on the bottom of the image. I’m very happy with the way this image came out and locations like Death Valley are a dream for shooting star trails.
I know that many people would not want to leave their cameras outdoors for many hours while they are sleeping, so the next best thing would be to shoot anywhere from 10 to 14 exposures that are about 2 – 4 minutes long. The hour or so, long exposure images will not give you the same look as an all night exposure, but can give you some very striking images. It also depends on the focal length of your image and I am always deciding what kind of shot I’m going for and then which lens I will need for that image. The other factor is the location of the Northstar and what the star trails will look like in relationship to the Northstar with the lens that you are using.

In the photo above, I opted for my 70-200 f2.8 lens and shot it at 70 mm at f 2.8 and ISO 1000. I set my intervalomter to 13 shots and picked out some boulders as my foreground element and did some test shots to see how the stars would move in the final image. We got back into the car and put on the heater, as it was freezing at the top of Aguerreberry Point in Death Valley. The resulting image that I processed in Photoshop, is a whole different feeling but one that I like very much because of the different focal length. I also decided to do a super wide angle shot in the same spot and try a couple of exposures with my 14 mm Canon lens. I set the ISO to 800 at f2.8 for 4 minutes. The resulting image below produced a pretty awesome shot too, with a different feeling.

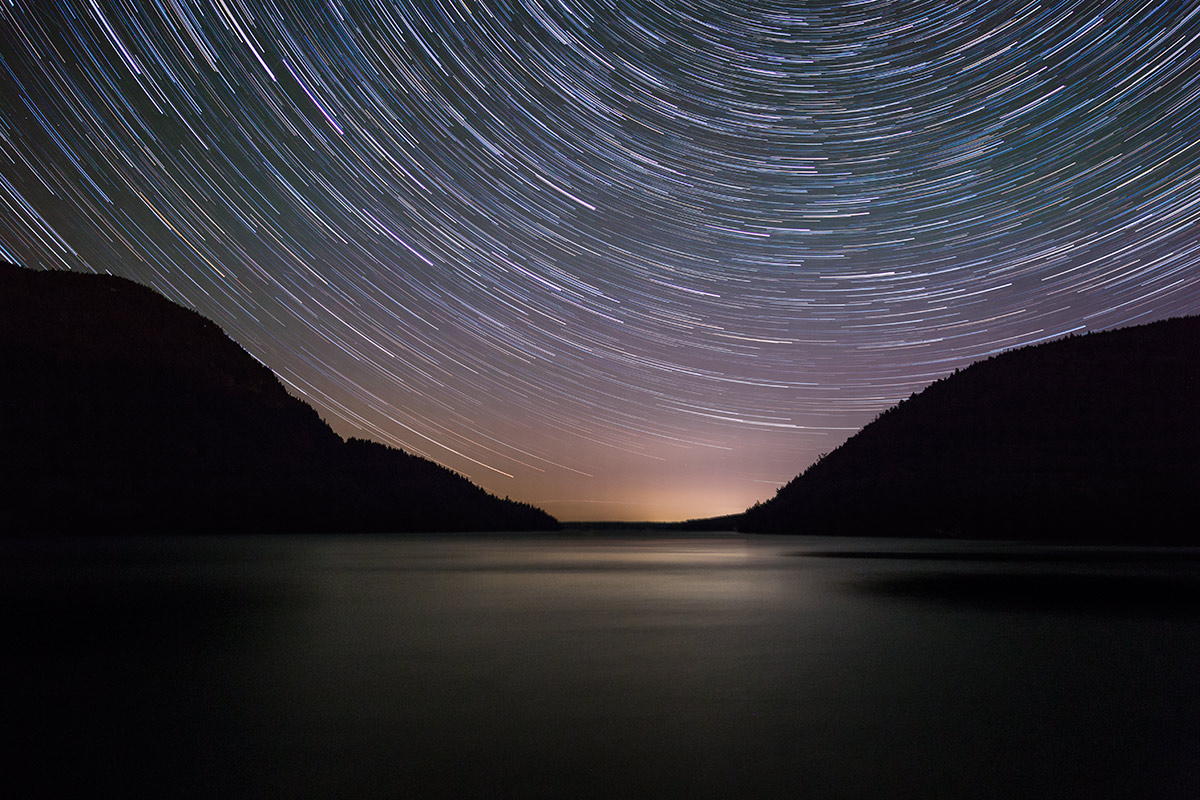
On our last night on this trip, we decided to do some time lapse photography star trails for Quicktime videos and we set our cameras to shoot star trails all night long using our intervalometers. We then decided, to also shoot star trails at the same location using the extra cameras and tripods that we had brought. I used the Canon 24-70 f2.8 at 50 mm and f 3.2 at ISO 500. I shot towards Las Vegas and might have changed my white balance to electronic flash, which is what I do sometimes to make the night lose the bluish look and look more golden. Since we did not have our intervalomters, we became human intervalometers, getting up from our blankets every four minutes to stop our cable releases and shoot another frame. We did this for about an hour and I just love the feeling of the resulting image below.

Sometimes, images of star trails look good even in black and white, and in the image below, I changed the color image to black and white and really like the feel of it.

Shooting star trails requires quite a few things including the right equipment, being able to deal with the cold, and having lots of patience. Having a little knowledge of Photoshop also helps and I love showing everyone how to shoot the stars and star trails in all of my workshops. It opens up a whole new Pandora’s box because the creative possibilities are endless. On my next workshop to Burma and Cambodia, I cannot wait to shoot the stars in the temples of Pagan and Angkor Wat. The night sky is out there just waiting to be captured so grab your headlamp and your tripod, but don’t forget the hot chocolate!
Thanks Scott. Really like the 14mm Startrail you did. It almost looks like a short film with a lot of movement in it. Liked the way you described your way with star trails.
Thank you Martin,
shooting star trails is pretty addicting and something I think I will never get tired of. So many subjects are out there to use as foregrounds….and also depending on your lens….there are so many ways to capture those trails.
If I could do this every night…I would!!
Hi Scott,
Great post and magnificent photographs! Just wanted to add, that even though we are in the digital age, you can still find a descent film camera for the purpose of shooting star trails and stuff and not worrying about sensor heating.
Anyway, I also saw some of your recent photos, and they are also just great. I am always inspired by your photography.
The HDR shots look awesome, I wonder if you could write a blog post about your post processing techniques, because I’m dying to know how you do it!
Thank you for your posts and photos, they are a constant source of inspiration to me.
Nice writeup. Let me know when you come to Cambodia and we’ll meet up for a shoot. I’ve been working on an exhibition for the last year which involves a lot of camping out in places I shouldn’t be in to capture star trails over the tops of the temples.
Could use some company… 🙂
Thanx Julian!!
so cool of you to write!!!!!
I love shooting stars!!!!!!!!!
Hi Greg,
I am really bad about checking in with my blog so I apologize. By the way, we all do worry about sensor heating with long exposures but when you can now stack your images in Photoshop,
shooting star trails is really a piece of cake. Thanks for the nice comments on my images and I really appreciate that….. and I do want to do a little blog on HDR and I should…..
so thank you for getting me motivated. My preferred piece of software is Nik HDR Efex Pro….. there are many out there and I like them all, but I really love the way Nik designs there interfaces
and it just spoils you to death…………..
thank you so much by the way we are really kind words…….. so nice of you to get inspired by some of the things I talk about!! that’s what it’s all about.. inspiring others
scotty
Hi Liam,
which I had paid more attention to my blog so I’ve seen this sooner. would have been nice to met up with you in Cambodia. I wanted to shoot star trails there a little while ago but did not have that much luck. But it definitely was on the agenda
but somehow the weather didn’t let us get what we wanted. by the way, I love the shot in black-and-white on your website of the two men sitting by the fire. is absolutely gorgeous!!!
hope we do get to meet up one day because I would really love to shoot with you!!! sorry that didn’t happen on my last trip but I wish I had checked my blog but I had no Internet at all while I was in Burma..
is such a bummer…
talk to you later Liam!!!! keep up those cool shots!
scotty
Amazing images. Great blog article very informative. Thanks!
thanx so much!!
scotty
What a wonderful wonderful article. Thanks so much for sharing this… I’ve just got a 5DMii and I can’t wait to try some of this out… your images are fabulous – can’t believe how relatively clean they look – do you have to do a lot of noise reduction?
hi scott–
just great, as usual.
have you tried using ‘startrails’ to assemble the shots. does it in just a few minutes and does a great job. for people who shoot canons, you can even include a black frame so it can take out some of the noise.
thanks again,
les
Dallas Photographer Les Wollam
Not sure what “startrails ” is….but I do it quickly in Photoshop……. love using PS and it takes almost no time at all Les…..
s
scotty–
look up ‘startrails.exe’. quick fast program that does all the work, taking each capture, making a layer, and condensing them without hassle. even makes a little 480×640 gif movie.