
Not the easiest thing to capture…
but when you do……Wow!

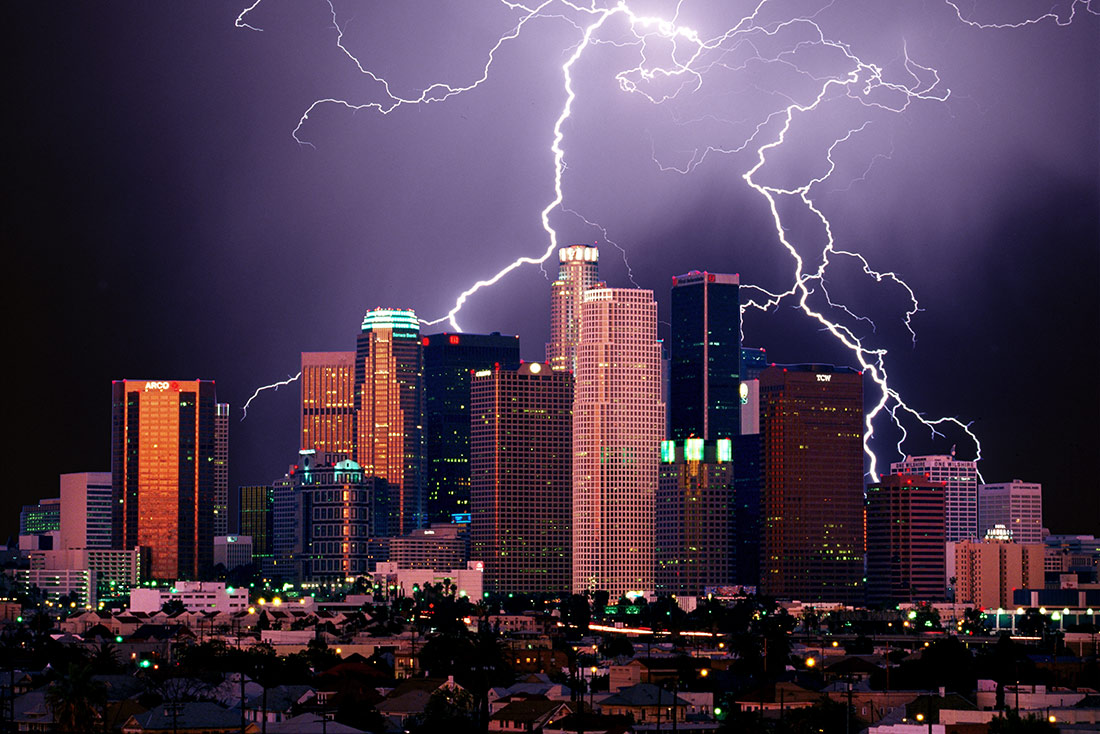
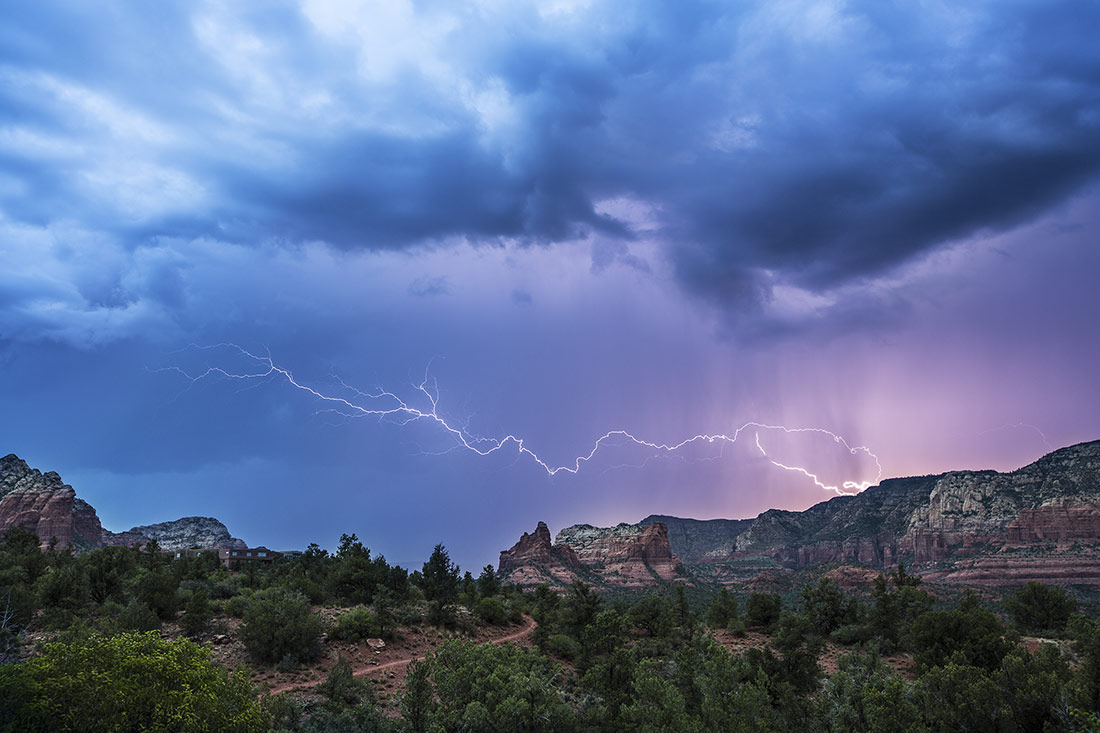
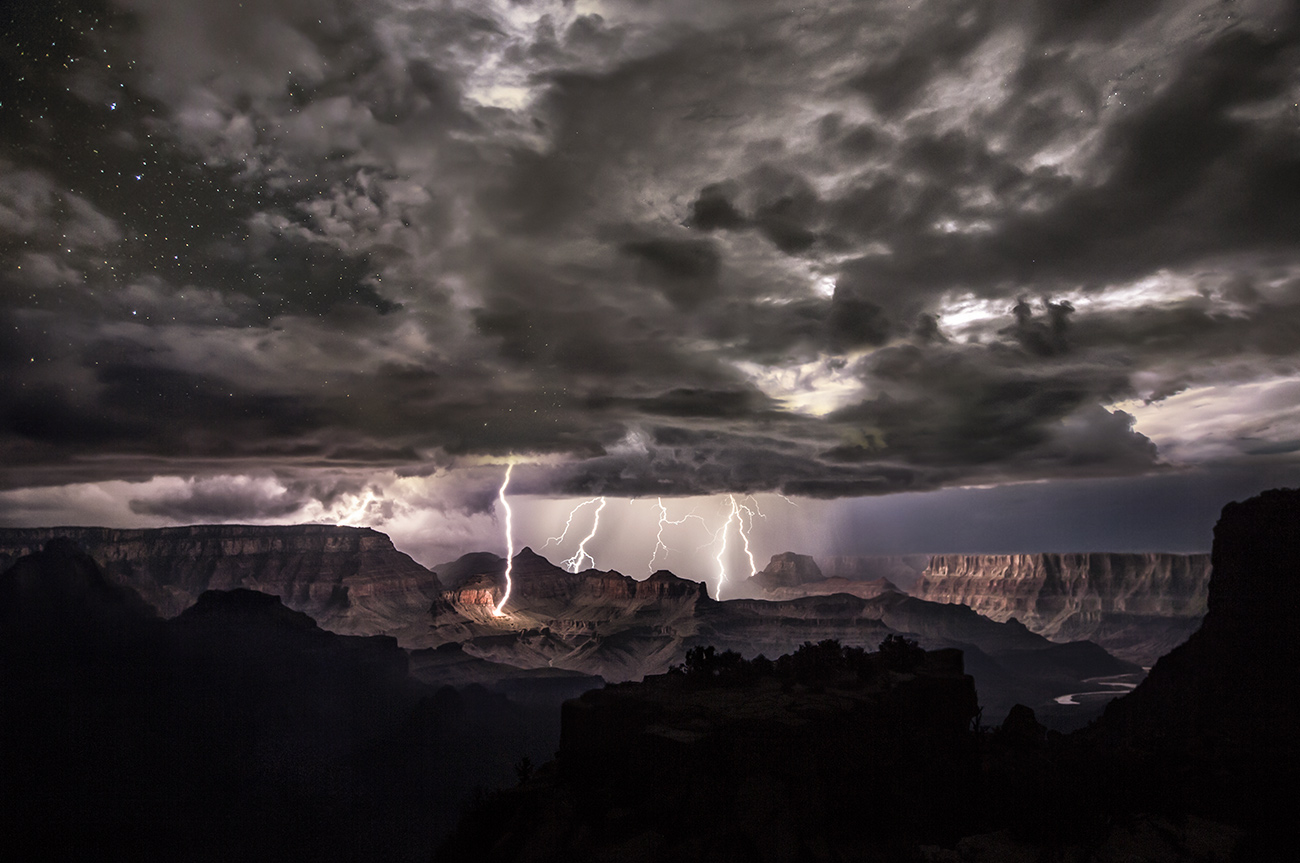
At the Grand Canyon with my fiancé Holly and a student in August of 2013. see story below….
There are so many things to photograph all over the planet, but without a doubt capturing lightning is one of the most difficult and rewarding. Each bolt lasts approximately 1 to 2 millionths of a second but seems to last longer to our eyes because of the latent image it produces on the retina. This can fool us into thinking that it is easier to capture than it really is but there are actually a few different ways where you can be pretty successful at capturing lightning.
The easiest way is to capture it after dark. You need a decent camera and having a cable release is pretty handy also but you need a pretty good tripod for sure! Capturing lightning after dark requires anywhere from less than a second to a 30 second exposure so a good camera and tripod are the key to shots with low noise and good contrast. You can capture a single lightning bolt or even many strikes in one image. You can also layer mask different lightning bolts into one image if you don’t move the camera position and sometimes this can make for some of the most powerful shots with lightning.
Looking at the sky, you first need to see where most strikes are coming from. Sometimes they can be in every direction but quite often, they keep striking around the same area. But also, you can have giant flashes of light called “in cloud” lightning that light up the entire sky or clouds and these make for beautiful brilliant clouds above the landscape. Although they can be gorgeous, it’s really the lightning strikes that you want to capture.
It can also start raining on you at any time, so I always carry my storm jacket, which is a waterproof cover for my lens and camera and I also have an umbrella in my car that I can strap onto my body with a huge belt or onto a light stand, and that protects me from the falling rain so that I can concentrate on just capturing the lightning. A headlamp is also beneficial for working in the dark & also for looking at the settings of your camera. But most importantly, you have to always be aware of your surroundings as people get struck by lightning and do get killed. This should always be on your mind so try and be as safe as possible when shooting lightning! When the rain starts, that really is the time to get under cover. It is so dangerous to be out in the rain when the lighting is nearby. I often shoot from inside my car which is a pretty safe place to be when the rain is falling.
Lens Choices
You can actually use anything from a wide-angle to telephoto to capture lightning and it totally depends upon how much of the scene you also want in the image. Often, the best results can come from using a wide-angle lens, anywhere from a 20mm to a 35mm lens, however the lightning bolts will usually be pretty small in the image. Since you have such a wide angle of coverage, you increase your odds of capturing bolts of lightning from the wide-angle view. On the other hand, using a focal length from 100 to even 300 will let you zero in on the bolts to get much more powerful strikes but you have to be good at knowing where the lightning is happening and you will also be limited to the scenery in the image. This can give you dramatic lightning bolts but with a telephoto lens, it might not give you much else but you can definitely use the lightning bolts as components to layer mask into other scenes if you decide to do that later. There are many methods and experimentation is the key to success!

3 strikes over the ocean and layer masked together in Photoshop
I like to use different focal lengths myself but with longer focal lengths that give you larger bolts, you do have to be pretty precise on where to point your lens. Quite often, you might miss many of the lightning strikes unless there are tons going off at the same location. If this happens, then using a focal length between anywhere from 100mm to 170mm can give you some very powerful shots with or without any scenery, but the bolts can pretty much fill up your frame. You also have to decide whether you want to shoot horizontal or vertical, as both ways have their advantages and drawbacks. Shooting vertically can give you stunning images with long bolts but since your angle of view is narrower, you really have to be more precise with aiming your camera. You have more luck quite often with a horizontal framing, where you can also capture more scenery, but lightning might strike above the frame so that is definitely a drawback also. Lots to think about and play with so be prepared with all of your gear!
Focusing in the dark
Focusing after dark has always been one of the most difficult things for so many of us to attempt to do. Many people think that the infinity mark on their lenses means true infinity and that really isn’t the case most of the time. It’s usually a little bit less than the infinity mark and the last thing you want are lightning bolts that are slightly blurry. Many times, I tell people to take their lenses out during the day, whether they are wide angle or telephoto, and focus on something very far away such as a mountain range, and then they can mark on their lenses where infinity really is with a small marker. This actually works pretty well if you don’t mind having a mark on your lens. If you are using a pretty fast lens such as a 2.8 or faster, your odds of being able to focus on a star or city lights far away or something that is even a little bit bright, is much higher due to the increased amount of light coming in from a fast lens. But even so, sometimes it’s difficult to find anything to focus on so you have to rely on other methods.

Many times, I focus on people that are shooting with me when they to a focus check for all of us by walking into the distance with a headlamp aimed back at us. It’s very easy to focus on the headlamp and depending on your lens, this is usually one of the best ways to at least get close to being able to focus in the dark. I do this all the time when shooting stars and star trails as I can use one of the depth of field apps that you can install on your cell phone, and this lets me know about how much depth of field I will also have when focusing on something either close or far away. There are many tools that will let you work on your focus and your depth of field but having critical focus for lightning and also your distant subjects which can just be silhouettes of the scenery, is important to the final impact of your image. You can’t hope to focus on the lightning bolt because it’s almost impossible as I have tried to do this many times without luck. This is something to really think about because it can be absolutely frustrating in pitch black when there is nothing to focus on! And make sure that your auto focus is turned off once you achieve good focus. Don’t forget this!!
Exposures
Your cameras meter is pretty useless when it comes to lightning so you have to pretty much know before hand how to set your camera. Everything happens so quick with lightning and with so much contrast from light to dark, the meter will be confused. Usually, but not always, if the bolts are pretty bright and close, you can set your camera to ISO 200 and shoot around f/11 and sometimes around f/8. If the strikes are further away and not as bright, I might shoot from f/8 down to f/5.6. Sometimes I might even have to increase my ISO but you have to be careful because the exposures can vary with different strikes and although one shot might expose beautifully, another one might be blown out. If you are shooting a long exposure, you might get multiple strikes or sometimes bright flashes which happens a lot and these can also totally overexpose the image. If you choose a higher ISO like 400 or higher, setting your f/stop to around f/16 might be good too! Just experiment and see what works for you. There is no one set method for perfect exposure of lightning. You have to see what works for you!
After dark on a tripod, with the settings I was just talking about, in either manual or shutter priority, you can shoot anywhere from a few to 30 seconds. The longer exposure of 30 seconds means you have a greater chance of capturing the lightning and you don’t have to press the shutter as often. You also have a better chance of capturing multiple strikes and most people I know like using long exposures at around f/8 or f/11 and ISO 200 to capture great images of the night sky with lightning. These settings seem to work nicely most of the time just as settings for the night sky and stars are often used over and over for great results. This helps as you can spend more time on setting up your composition and less time worrying about camera settings. You do have to look at your LCD and see if things look too dark or too bright and adjust accordingly, but something close to these settings will probably get you good results. Also, never have your image stabilization on as this will definitely give you blurry images and you also never want to use mirror lockup or high ISO noise reduction.
I like to use a cable release, not to get a sharper image but to make it easier to take multiple pictures. You can be sitting down in a chair and pressing the cable release from wherever you want rather than standing next to the camera and pushing the shutter on top of the camera. You can also press your camera’s shutter as you really don’t need the cable release unless you want to use one. By the way, if there are any city lights nearby, you might need to decrease your shutter speed to 10 to 15 seconds or so as you don’t want to over expose the scene. Last, I almost always use a white balance of daylight which gives a nice purple tinge to the images which I really like. Remember, slower shutter speeds are the key although you can shoot lighting from 1/4 to around 1/15th of a second but I prefer to use a lighting trigger for these kind of exposures.
Using a Lightning Trigger
Trying to capture lightning during the daytime or at dusk is almost impossible because you won’t be able to use long exposures and with a short exposure your chances of hitting the shutter at the right time are pretty close to nil. One piece of gear that helps a lot is a good Neutral Density filter, which will let you take longer exposures without over exposing. These can work great but they do really darken the LCD so it is harder to work with them on. For me, the secret to capturing lightning during the daylight is using some sort of lightning trigger which senses the lightning bolt in about one millisecond and triggers the shutter for you and almost seems like magic! I have used many of these triggers as I own quite a few but they can be sporadic and trigger when you don’t want it and miss some great shots when you do want it triggered. However, for the most part they work amazingly well and are absolutely essential for anyone who wants to capture lightning, especially when there is daylight out.
Usually I like to be in shutter priority around 1/4th to 1/15th of a second, which are usually long enough to capture at least one strike but not overexpose the image. I’m still usually at around ISO 200 and you will probably get good depth of field from a small aperture from the setting. The thing that is amazing about these triggers is that you can set up your camera and just walk away, and watch your camera fire every time there is lightning. I did this three nights ago, here in Sedona and my lightning trigger worked flawlessly for over two hours, while my friend was constantly pressing his shutter as he had no trigger. I also use the trigger four longer exposures of up to 30 seconds depending on how the lightning is that particular night and what I want to capture.
From daylight to even pure black in the sky, lightning triggers can fire your camera while you are sitting in your car or sitting outside in the chair drinking coffee and they are one of the coolest things you could ever own and definitely an important part of capturing lightning. I love them after dark as using them on my cameras when the light is gone is when they really shine for me. They sense the light and you do not have to keep firing your shutter every 10 to 30 seconds hoping to capture one or multiple strikes. They are like magic and I really cannot live without them! But one thing to note ~~ Sometimes they are not fast enough to capture the first downstrike,which often gives the spider like bolts that are incredibly wild looking….as they often catch the upstrikes..which happen after the bolts hit the ground. So, some people prefer to just use a cable release and push the switch to the on position for repeated exposures and never take a chance at missing any of the spidery bolts. So, it is up to you what you want to do but I have had a lot of luck with my triggers and for my Lightning over the Grand Canyon images, I was using an AEO trigger and it worked flawlessly for over two hours that night.
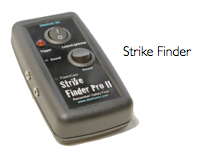
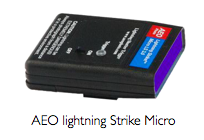
The three triggers that I like the best are the AEO Photo lightning strike Pro micro 4, the Nero lightning trigger and the Strike Finder. Some are bigger than others and some are less expensive than others but they all work and all help tremendously at sensing the lightning and taking the picture for you. For daylight hours, I think they are absolutely essential and there is really no easier way to successfully capture lightning and for the money, this is one incredible piece of gear that I recommend to anyone interested in capturing lightning! As I write this, it’s thundering with lightning outside here in Sedona and you can bet that I will have my lightning triggers with me when I go photograph later. They are always in my backpack!!

 This was shot at dusk with a lightning trigger
Photoshop and Lightning
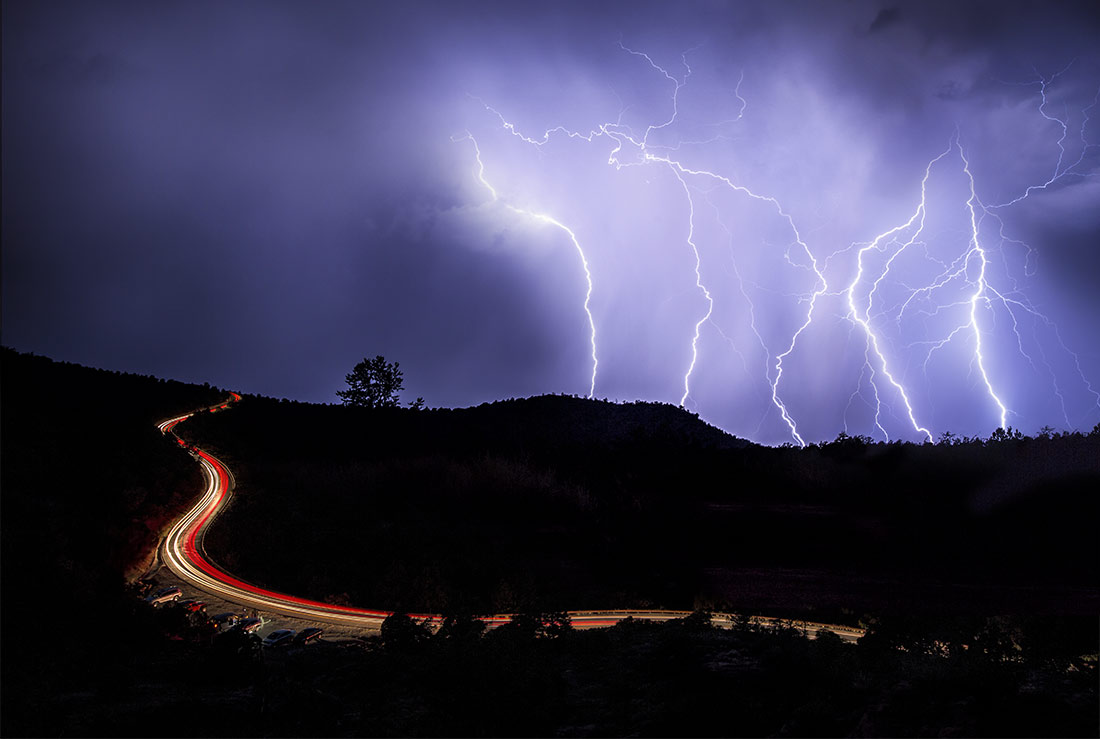 2 strikes and car trails in Sedona, Arizona and layer masked together in Photoshop
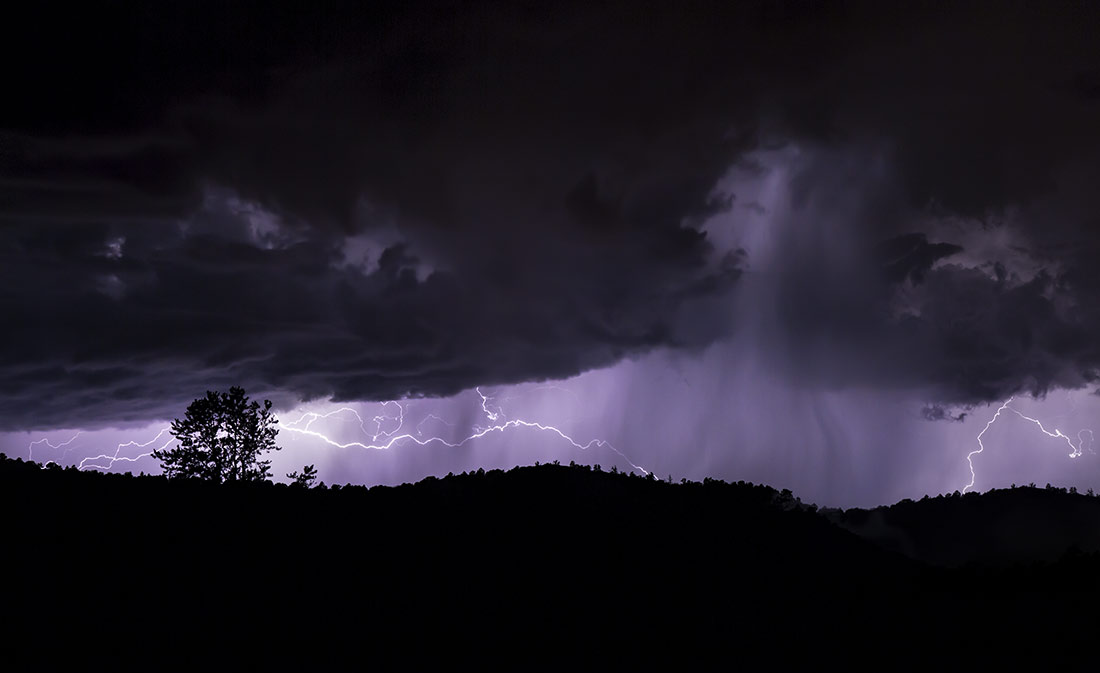
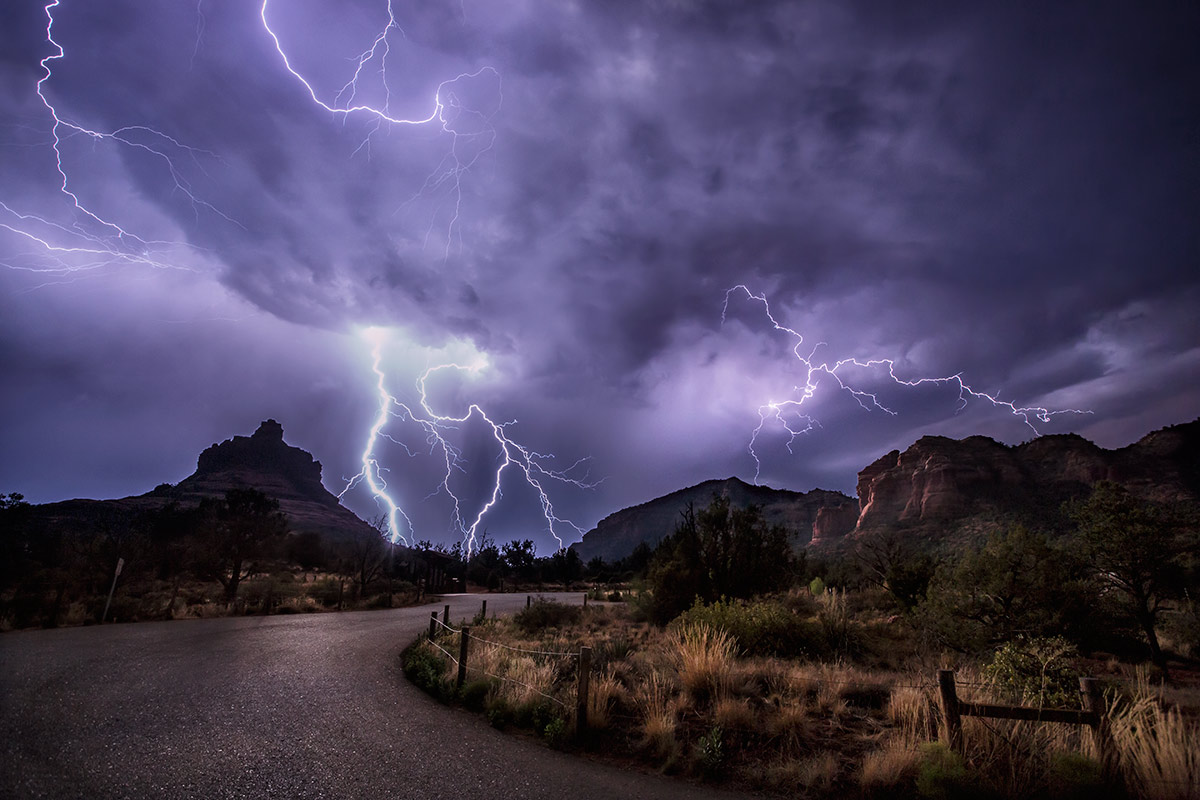 3 strikes over Sedona layer masked in Photoshop
To really get the most out of your lightning images, you have to be pretty adept in post processing. First you need to be shooting in raw and second, you need to use the different controls from camera raw to really fine-tune your images for you from working on the brightness of the lightning strikes to emphasizing the tonality of the clouds. As I mentioned, shooting with a daylight white balance which I prefer, will give you a more purple tone to your images which I find very attractive but in camera raw you can change the overall color temperature to anything you want.
But what is also crucial, at least for me is the ability to combine multiple strikes in one image for a multiple exposure. Sometimes you can get lucky and get multiple strikes in one image from a long exposure but many times shots that are minutes apart from each other would look great together and that’s when Photoshop comes to the rescue. As long as you haven’t moved your tripod, you can work on multiple images and give them the same settings in camera raw and then open them up as layers on top of each other in Photoshop. Then it’s time for a layer mask.
Painting in or painting out different things in the image, you can create multiple exposures with different lightning bolts and come up with something incredibly powerful but the key is to make it look realistic also. Putting 10 lightning bolts together in one shot does not mean that you have made the perfect lightning shot as it really needs to look somewhat realistic…. because one thing that I have tried to tach for years in my Photoshop classes is that the secret to Photoshop…. is to make it look like no one knows that you used Photoshop!
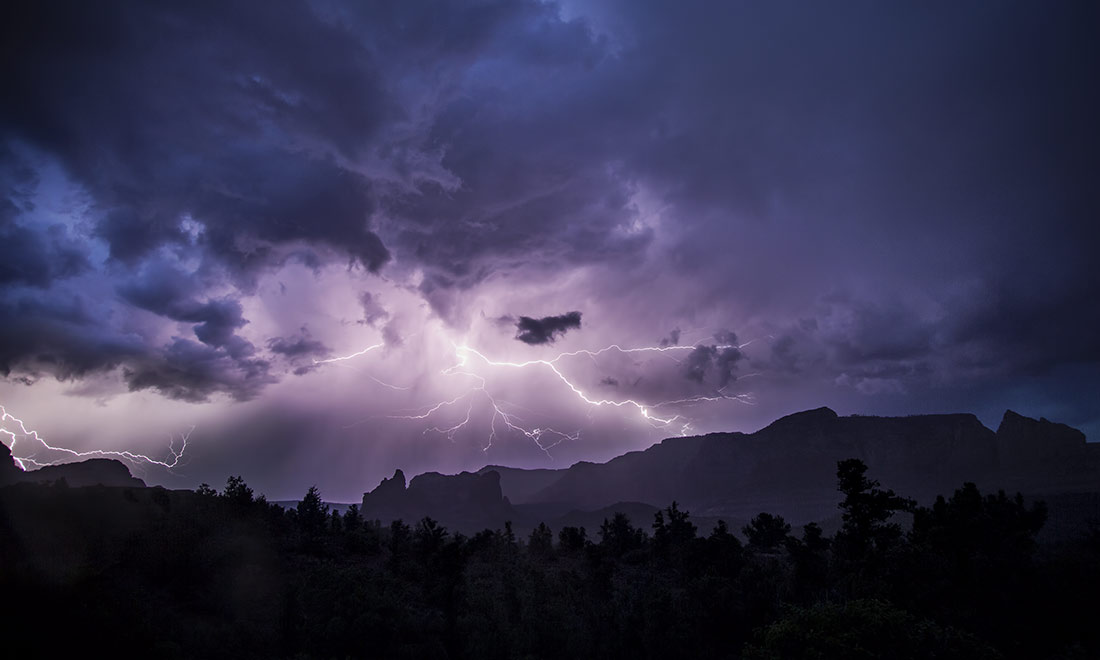
In the first image above in Sedona just a few nights ago, I captured the lightning strikes above and I decided to use two images with two different strikes together in one image. I then also layer masked in some car trails that I had shot because I was just playing around as I love photographing almost anything after dark. The result is car trails and lightning here in Sedona and the sky is the limit when it comes to working in Photoshop and shooting after dark!
The second shot above was in a different area in Sedona and without moving my tripod, I had great bolts but at different times. I layer masked in bolts from 3 separate shots to give the final image a very powerful feel whsih to me was a realistic sense of what it was like that night. Have a good time with shooting lightning but don’t forget to be super careful as lighting strikes are incredibly deadly!! If the strikes are huge and close by, it might be time to take cover and try again another night!
The right place at the right time
Knowing where to be and when to be at the right place for capturing lightning is probably the toughest thing you could ever do when shooting after dark. You obviously have to be in a location that is known for lightning and then you have to plan on being there at hopefully the right time. There are many websites and also some very cool products, like Radar Scope, that really help predict when storms are approaching and they do help predict when lightning might occur, which really helps. After living in Los Angeles most of my life and seeing lightning only a handful of times in that city, living in a dark city like Sedona, Arizona is just amazing as I shoot after dark here all the time and I’m always on the lookout for lightning, but mostly during the monsoon season.
Last night, I decided to drive to the Grand Canyon with my fiancé Holly and one of my students as the weather was looking rough and I was hoping to capture lightning over the Grand Canyon. We got there before sunset and it was not super clear so my sunset shots were just okay but when it got dark, we drove to some better lookouts that I thought would be great for the background if we did get lightning. I had been showing my student Rolf for weeks how to capture the night sky including lightning and was hoping so much that we would hit the holy grail. We didn’t have to wait long as the roar of the thunder was incredible.
As soon as I saw the first bolt, I grabbed my camera gear but knew I had to share this amazing moment with Rolf and yelled to him to get his camera as he had no intention of shooting after dark. I also set up my Holly’s camera and of course I got my lightning trigger that I’m totally addicted to but we first set up our focus for our cameras. I had Rolf walk far away with my headlamp and I focused on the light and then I did it for him and also my fiancé. Once we were focused and we aimed our cameras towards the lightning, we were able to shoot for the next two hours which turned out to be one of the most memorable evenings of my life.
Listening to the deafening roar of some of the loudest thunder I’ve ever heard and watching monster lightning bolts parade nonstop over the Grand Canyon was really one of the best times I’ve ever had in my life as a photographer. We tried different lenses and focal lengths and I decided that wide-angle was the best that night to capture the grandeur of the Grand Canyon. The amazing clouds with the stars flowing through them and incredible lightning bolts was about as gorgeous a site as I could ever want to witness. Being at the right place at the right time doesn’t always happen but when it does, it’s the best feeling in the whole world. My four favorite words as a photographer are always “I got the shot!!” But the very next morning, I was so unhappy to hear that Rolf posted one of the best images from the shoot, without asking me if I minded. He knew it was my favorite shot of the night as I was screaming about it all the way home. He also knew it was not really his shot to post but I guess that didn’t really matter. That image went viral but he doesn’t want anyone to know I helped him with it which is a shame. Sometimes, as an instructor, helping others find and create the perfect shot comes back to bite you in the butt as it did with him. But most people I help are incredibly thankful and I was so happy to be there that night as it was beyond spectacular. The image of the lightning at the Grand Canyon at the beginning of the article is a double page spread in the November 2014 issue of National Geographic and has been published countless times all over the world. A good shot of lightning to me is the holy grail as I love photographing after dark more than anything!
Being at the right place at the right time is what it is all about. But if you want to capture lightning, being prepared but being as safe as possible is also the key. And then, when you do capture the shot, it is the best feeling in the world as a photographer. Lightning is so elusive, but with practice and patience, you will get some great stuff!
Scotty, You are such an excellent teacher, You spelled this out so even a dense guy like me can get it. Hope to see you soon shooting Lighting,
Tom
Hi Scott
Nice article ! & Glad to see you are still in one piece !
Take care !
Efisio
The coolest man in black in the world!!! we miss you buddy!!
scotty
you are my good bud!!! and a great shooter Tommy boy!!!!!!!!
Really? Someone didn’t want to let people know you helped him with an image? geesh…No more comments on that one. Amazing shots! You were brave at the Grand Canyon, though. All I read made it pretty clear that it’s a dangerous place to be during a lightning storm. Glad you were all ok.
Yes Debbie…..so many students throw their instructors under the bus. They don’t want anyone to know that it wasn’t their shot. Happens so much that it is unreal.
So many of my friends who are instructors tell me the same thing. A lot of insecure people out there!!!
Miss you Debbie!!!
scotty
Teachers, mentors, fellow students, or not….as photographers we all owe a debt to any photographers who came before and inspired us to make make our own photographs.Seeking and finding that inspiration propels us to learn and be better than we are…hopefully that life lesson will sink in eventually….I assisted a couple of your classes a few years back at JDPW and I know how willing you are to share your knowledge with others…keep up the good work…
Hey Larry,
good to hear from you after all this time. I miss teaching over there but moving to Sedona…..well, was pretty amazing for Holly and I. Loving it. A different world than LA.
But I still teach at different places including making the 8 hour drive to UCLA to teach. Gotta really love teaching to do that……
love your comments!!!
thanx Larry,
scotty
Thank you for sharing such an amazing Grand Canyon experience, the photographs are beautiful, just incredible, great work!
Back in the film days, I was shooting lightning at Canyonlands with 4×5 linhof, the air filed with static and snapping sounds, I grabbed that tripod and got the hell out of there. I’ve captured lightning several times since, but never the same with digital. Now that the cameras, tools and techniques are there I can’t wait to try it again. I’m ordering a trigger before I head out to Arizona next month.
Thanks for sharing your techniques, also enjoyed the star trails images and info.
Miles,
Had to write back to you as I never check my blog and I’m sorry about that. email is always much better… because I check that all the time. but thanks for writing about the Grand Canyon photos. was a special night and something that I was praying for.
ethical story about the film days and shooting lightning the Canyonlands. I have many great stories like that also as film was so integral in my life. I’ve been shooting a lot of lightning lately while here in Sedona, where we moved to a couple years ago.
it just amazing watching a lightning storm from your porch. and of course, I go everywhere to get the best vantage points…. but it can be dangerous. hope you got a good lightning trigger… there are two great ones out there! and have fun with your star trails also.
love photographing the night sky… so many great ways to do it!!
ciao Miles,
scotty
these pictures are wonderful. Congratulations
thank you so much Demostenes…….
scotty