
If there’s one thing that I absolutely love to do, it is trying to capture car trails after dark in many different environments. I have taught many classes after dark and whether it’s involving shooting stars as points of light or star trails or even light painting or so many other things….. but I have to say trying to capture the lights from car headlights and taillights in different locations is incredibly rewarding for me. I’m always trying to find new ways to capture these car trails and with a little forethought and creativity…. and of course the right gear, the sky is the limit.
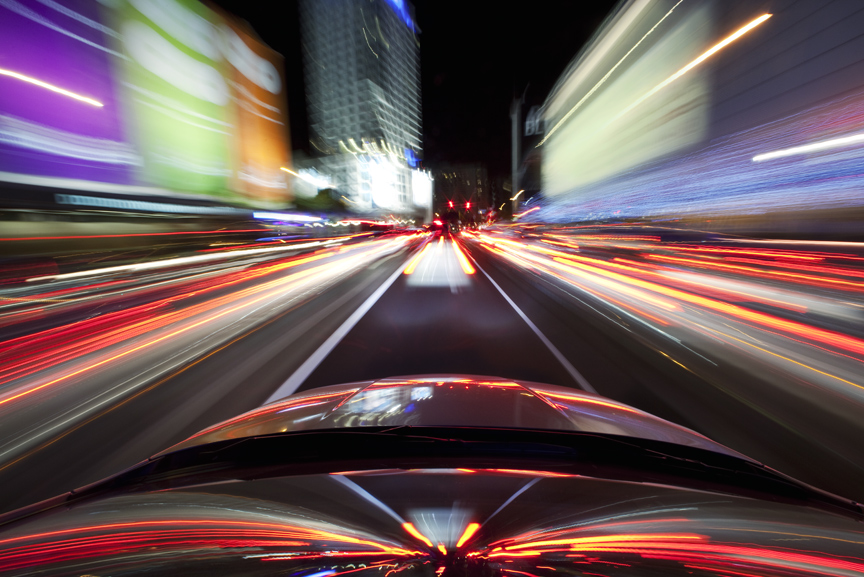
In the image above, I was trying to create a similar feel to Warp Speed in the Star Trek and Star Wars movies and with a little bit of playing around, I came out with some fun techniques. On this particular night, I was finishing up a class that I was teaching at the Julia Dean Photography Workshops in Los Angeles where we were shooting car trails on the bridges above the 101 freeway. The class was called Afterglow: Shooting after Dark and it was all about being as creative as possible after the sun went down. There are so many possibilities to create artistic images and different visual feelings after dark but you have to be pretty good with your gear but also have to have a pretty good imagination. Pre-visualizing what you want to get is a big part of the game. On this night after we were all shooting the Walt Disney Concert Hall in downtown Los Angeles, I left with one of my students Mike Regan and we headed towards the Staples Center knowing that the Lakers game was going to be over soon. I wanted to get as many cars on the street right by LA Live and just off of Figueroa. There were so many colors from huge billboards on the sides of the road but this was also a big thoroughfare for people to leave to get to the freeways and go home after the game. I knew before I had left for my class that I wanted to try something different after my class was over, so I decided to bring my Fat Gecko suction cup camera mount with all of the rest of my gear.

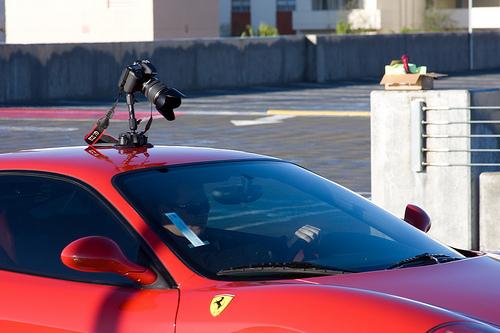 The Fat Gecko camera mount is such a great way to attach your camera to many kinds of surfaces using suction cups and try all kinds of different ideas but for me, my favorite is attaching it to my car although you do have to be careful. It’s not really made specifically for high-end DSLR’s, but it has worked pretty good for me so far as long as you play it as safe as possible. I decided to attach the camera to the top of my car, right in front of the sunroof and I had my cable release hanging down into my right hand and my left hand was on the steering wheel. Mike was holding the camera strap just in case the camera came off of the suction cups so he was my last line of defense so that my camera would not end up being run over by a million cars.
My friend Evan, who shoots for Road and Track magazine and others, has helped me understand how to photograph slow speed movement of cars to make it look like they were going faster and these are the kinds of images you see in all kinds of magazines and especially for all kinds of car manufacturers and even motorcycle companies. Knowing what I might have to do to capture what was in my head, I set my camera at about a five second exposure and waited till many of the cars were leaving the Lakers game and then got in the thick of the traffic.
I thought maybe driving around 10 miles an hour might give me the best feeling of warp speed and with that five second exposure, I decided to try it out. I shot as many images as I could with cars everywhere and then drove around to a parking lot where I could check to see how the images were looking. Literally, from that first pass, I got exactly what I wanted and Mike and I gave each other the high five! I went back and did another pass and then I let Mike shoot his images and let him press the cable release using my camera set up with my Canon 5D Mark 2 and my 14 mm lens that was set up to around f/11 for maximum depth of field.
The image below is another shot I did from another street nearby in downtown LA that night and it has a totally different look as the lines are a little bit more squiggly and sometimes you really have no idea what you’re going to get and that’s what’s so fun about doing this kind of photography! I used the same exact set up and exposure and you can see my Mazda CX-7 and the lights reflecting off the hood in the bottom of the shot, just like in the first shot above. One of my favorite places to do similar kinds of shots like this is in Las Vegas with neon everywhere and I love driving up and down the Las Vegas strip and bringing my Fat Gecko and having a blast shooting all over the place. It’s so much fun doing things like this and for me and what I tell all of my students is that shutter priority really is the fun mode on your camera where the sky is the limit and there are so many different ways to capture whatever is in your imagination.

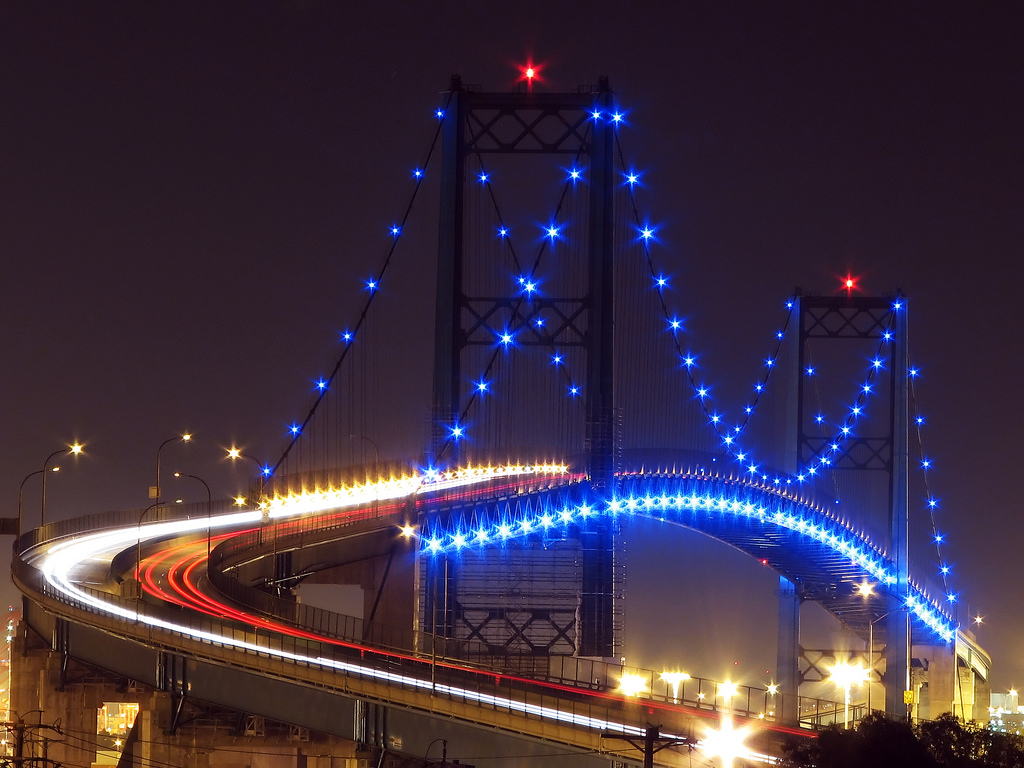
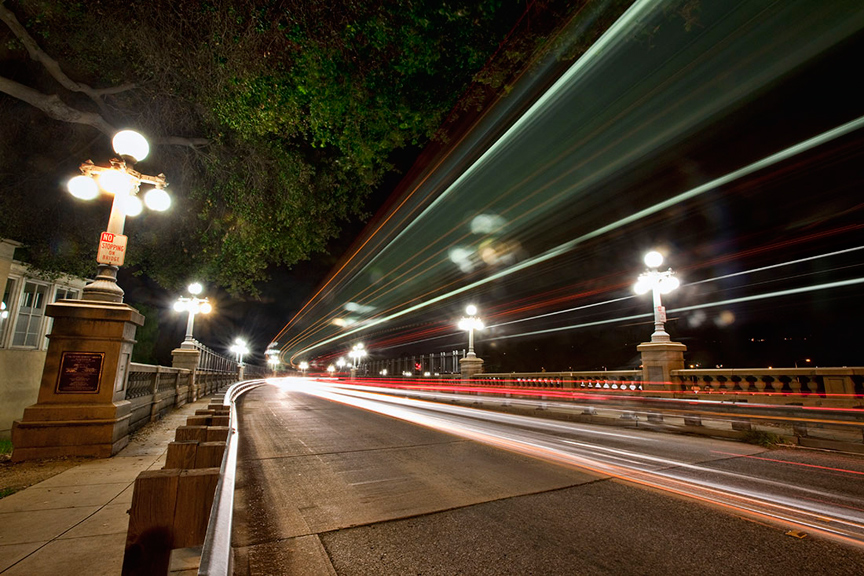
There are so many ways to shoot car trails and if you have a steady tripod, you can capture all kinds of car trails as long as you have some good ideas and some good locations. One of the spots that I took my class to in Los Angeles was the Vincent Thomas Bridge which is in San Pedro and I took them to one of my secret locations way above the bridge and showed them how to capture the cars in both directions with a long lens as we were very far away. Shooting car trails becomes second nature after a while and you realize that as long as you have a sturdy tripod and hopefully your cable release, and a camera that can handle long exposures without too much noise, then you’re probably going to end up with something pretty powerful. The image below was shot with my 300mm f/4 Canon lens at around 20 seconds @ f/20 and ISO 100. You always want to try and keep your ISO as low as possible as with long exposures, whether they are car trails or star trails as there really is no need to shoot at a higher ISO because your long shutter speed is giving you just what you need. There is such a misconception about shooting after dark, no matter where you are, that you need a higher ISO. Not true at all and keeping that ISO down will give you the sharpest image possible with the most detail. And one of the cool little bonuses that you get from shooting at small apertures like f/16 or smaller are the little starbursts from lights. All of the blue lightbulbs on the bridge became a starburst effect from f/20 and I love how it added to the overall impact and feeling of the image. We had a fun night with my class at the bridge and if there’s one thing I love to capture after dark, it’s beautiful bridges!
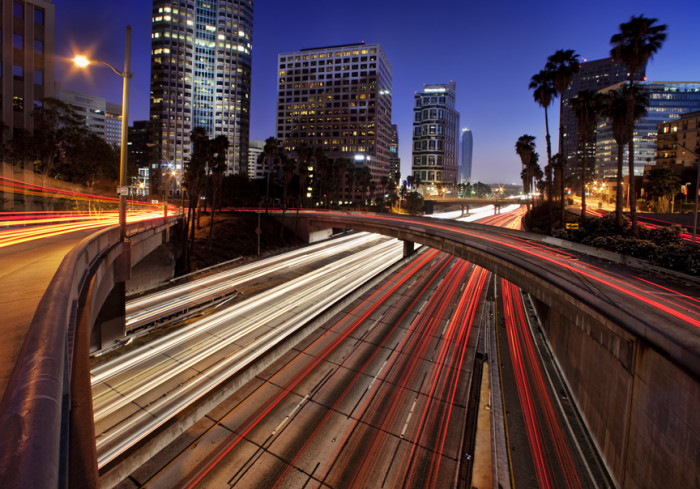
Another place that I love to photograph after dark in downtown Los Angeles is right above the 101 freeway and pretty much any day of the week, anytime after dark, you’re going to get a million cars because the traffic in Los Angeles is never ending. It is pretty much the major reason that I moved out of LA after living there my whole life and moved to Sedona, Arizona with my fiancé about a year ago. What a difference living in a town with only 12,000 people compared to 15 million. But of course I don’t have all of the after dark photo opportunities with incredible car trails but I have a ton of great opportunities with stars and star trails as Sedona is considered a dark city and one of the best around for capturing stars and star trails after dark. I just set up my camera and tripod right on my deck outside our home and shoot all the time as there is almost no light pollution whatsoever from anywhere after dark. But if you want to capture great car trails, most of the time you have to be in a pretty incredible area with lots of cars.
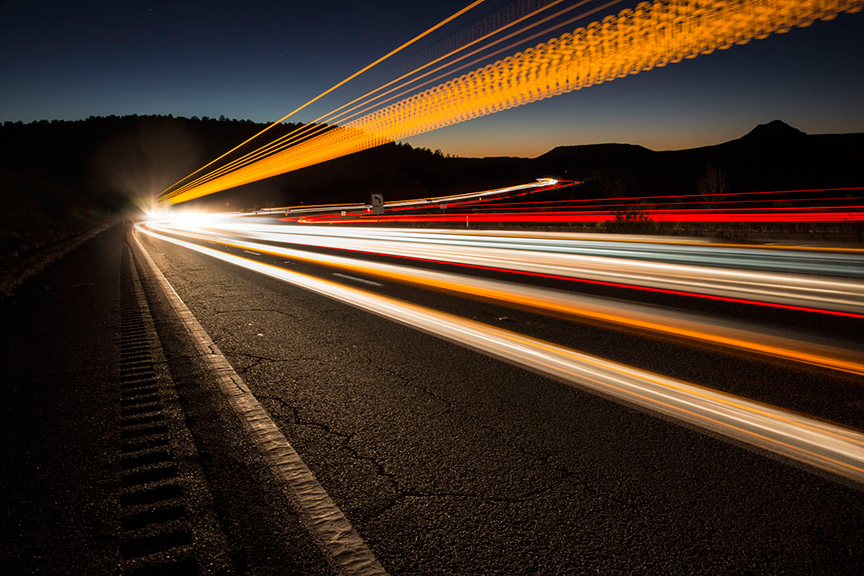
In the image below, above the 101 freeway, I set up my tripod right above the edge of the overpass/walkway but I told all of my students to make sure they kept their neck straps around their necks as if their cameras fell onto the freeway below, I didn’t even want to even imagine what could’ve unfolded. Scary stuff when you’re above a ton of cars so you have to be incredibly careful. I once again had my 14 mm lens and set my camera to F9 and 15 seconds at ISO 100. After a while, you pretty much know that you’re going to capture something pretty sweet if you know your settings and have a good idea where your camera should be placed.

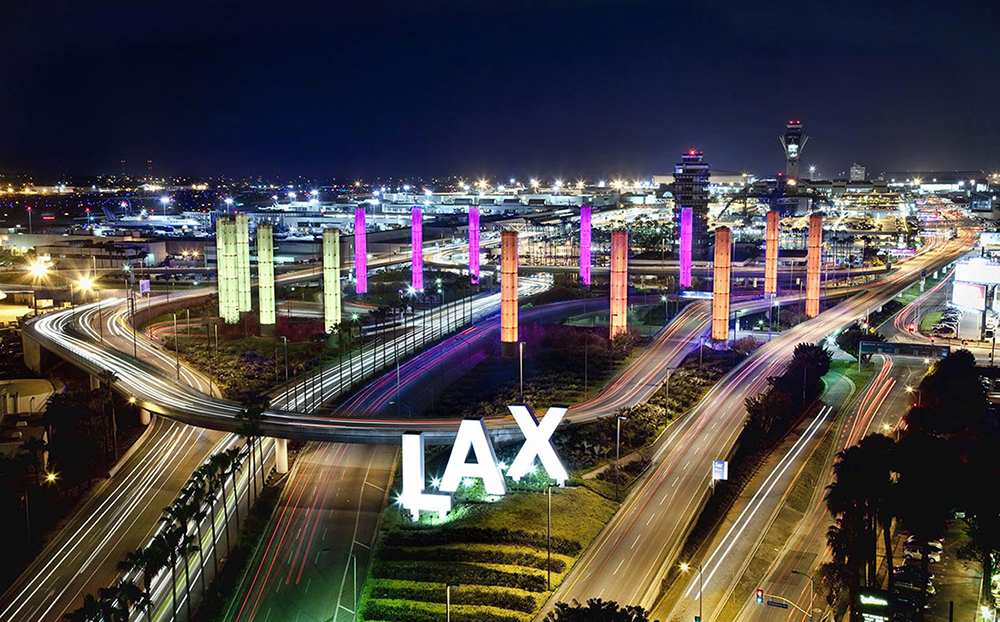
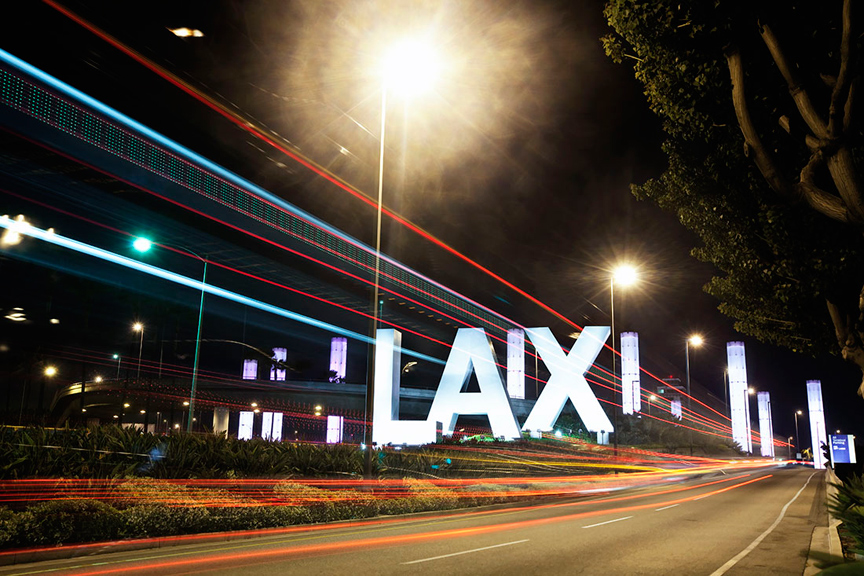
Being an instructor at UCLA Extension, I was able to get special permission to shoot Los Angeles International Airport from above and I couldn’t wait to go there one night with one of my students and capture one of the most amazing airports in the United States just as the sun was setting and then right afterwards. Capturing the afterglow, right after sunset, is when you can capture the cobalt blue sky if you know when it is happening and how to set your camera the right way. Shooting stock photography for as long as I have, I know that the cobalt blue is one of the best times to shoot after dark as they make incredibly compelling images that are great for advertising. As usual, I got to my vantage point earlier in the day to scout out the right locations and then decide on which lens choices would be the best for that particular angle where I was on top of a high-rise. Shooting with a similar setting on my camera, but closer to 10 seconds, and a higher f-stop, I captured LAX from above with the neon tubes changing color every 10 seconds and the nonstop movement of cars in every direction going in and out of the airport. But I was really focusing on getting car trails and I used layer masks to bring in more car trails from different shots that I had taken. Layer masks are the key to great car trail images and to me, the most important thing that anyone can master in Photoshop.
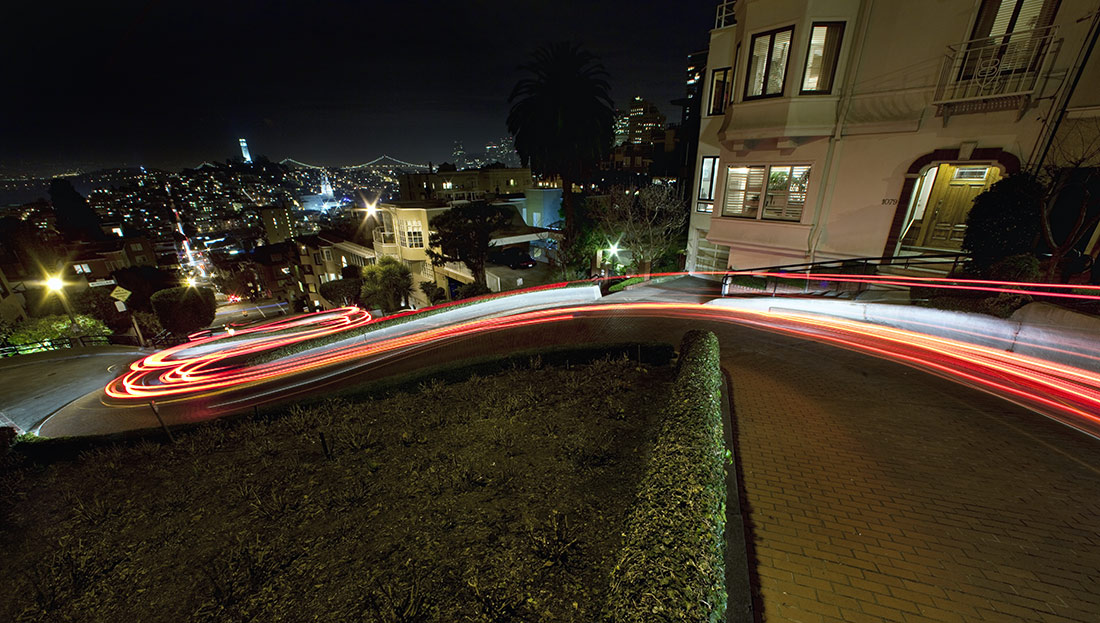
Sometimes, I decide to leave with my fiancé Holly to go and shoot nighttime shots in a great city like Las Vegas or San Francisco that has so many opportunities after dark. On one of my trips to capture San Francisco after dark a while back, I shot Lombard Street the way probably many people do, from above. The image below shows that vantage point. I set me camera at a 30 second exposure at a small aperture and I was standing on a lamp post and managed to get my tripod legs close together so that I had a higher vantage point. Although I had shot from all over the place, even in the middle of Lombard Street halfway down, this vantage point it pretty impressive.
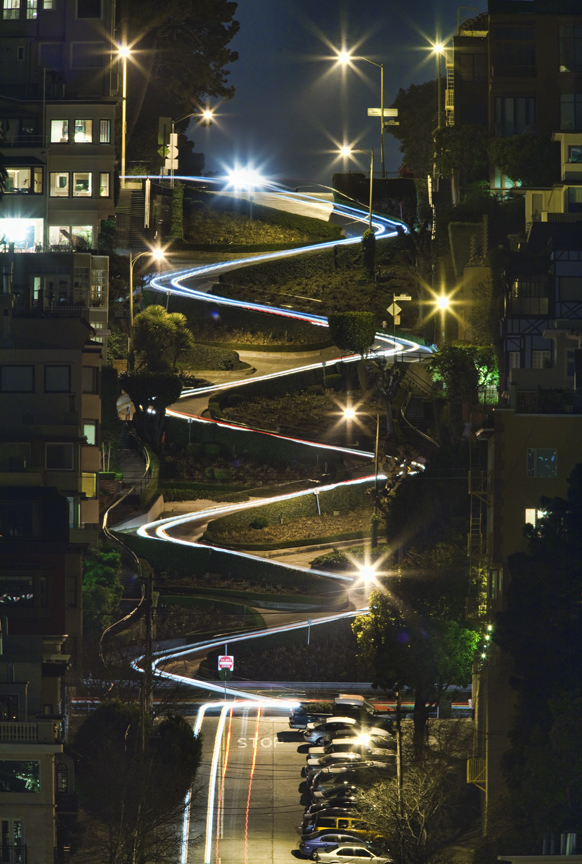
I wasn’t really satisfied as I wanted something completely different and I went to scout out different viewpoints to capture the infamous Lombard Street from a different angle. I decided to take my 500 mm f/4 and my tele-converter and when with Holly to scout out some different vantage points one afternoon. From about a mile away on Lombard Street, I decided to pull over and see what it might look like to capture this incredible street with a super telephoto. I could see in the distance the curves of Lombard Street and knew that I might be onto something so I pulled over and with Holly in the car, and I ran to the middle of the street with my tripod and 500 mm lens with my 1.4 telly converter attached. I cannot believe what I saw and knew that I had finally found the vantage point I have been looking for. I knew that we needed to come back later that night and that’s exactly what we did and with Holly in the car once again, because we had to double park as parking is crazy everywhere in San Francisco, I set my tripod up in the middle of the street from about a mile away and capture the image below. Buses kept coming down every couple of minutes and I had to keep moving my tripod to the side of the road but as soon as they would go by, I would be back in the middle of the road with my tripod, camera and cable release. A 30 second exposure was just what the doctor ordered to capture the cars coming down from top to bottom as they were going about 5 miles an hour on the windy road of Lombard Street. Usually shooting around f/11 or f/16 in a situation like this will give you just what you need and of course ISO 100 is where you need to be also. This was one night I will never forget as I had never seen an image shot like this before and I was so happy to capture something completely different and unusual in one of my favorite cities in the world!
I love to photograph cars everywhere I go but I also love capturing the lights from trucks and buses as their much higher up in the air and can be incredibly powerful in havoc lately different look than typical card trails do. I guess we could call these bus and truck trails although I have never called them that…. but I love keeping my eyes peeled, especially with my students as we are always on the lookout for these special lights when were shooting car trails and someone is usually screaming out “Truck!!!”. The two images below show what the trails from buses and trucks can look like and they are completely different animal and something that I love capturing whenever I can.
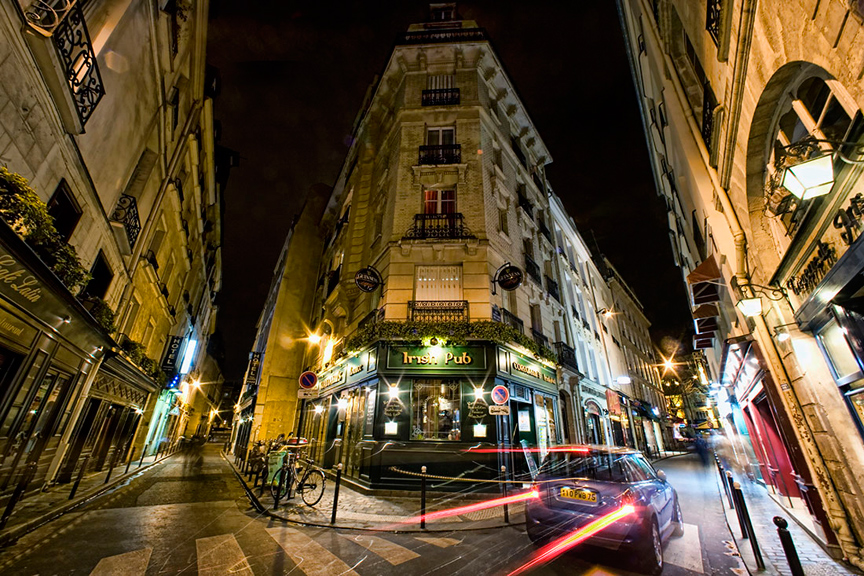
Sometimes I like to experiment and have fun trying different things with car trails and with this next image in Paris………I captured this Mini Cooper with it’s taillights looking light they just put on their afterburners. After doing this for so many years….I love figuring out how to capture wild things and this secret I will have to keep hidden in my vault.
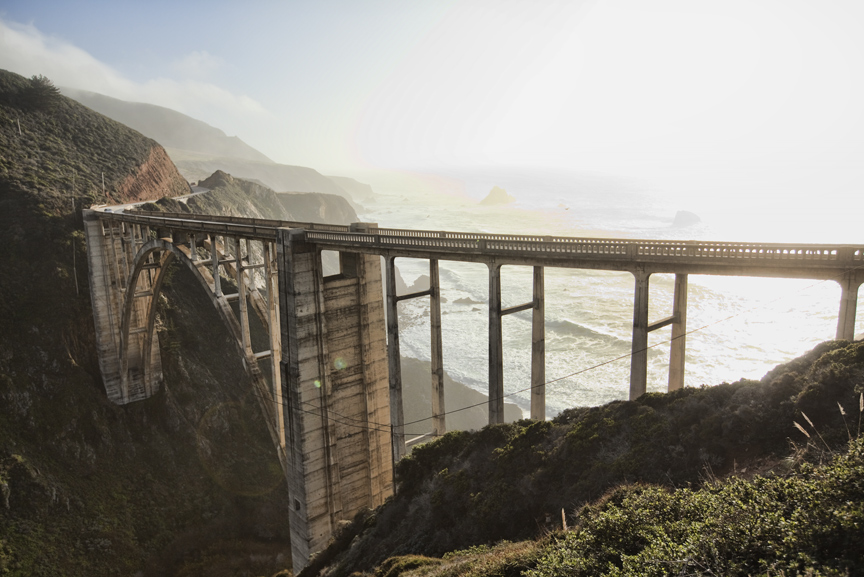
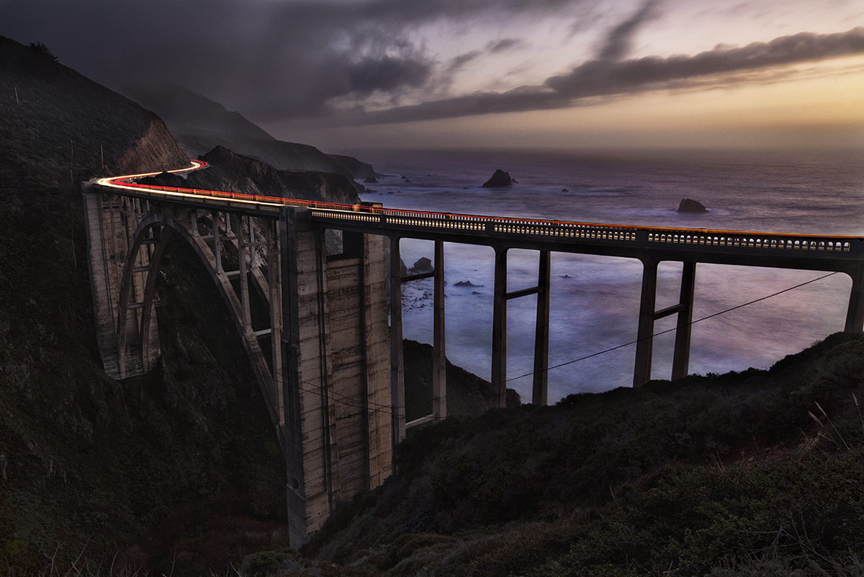
In this last image, I also wanted to capture something that was on my mind as I have so many ideas for images and I just have to find the time to go out and capture them. In the first image, I was leaving Big Sur in Northern California with Holly and knew that I wanted to capture one of my favorite bridges in the world, the Bixby Bridge, after dark with car trails. I scouted out the angle I wanted to shoot from and below you can see what it looks like during the day. I do this quite often as I want to know exactly where I will be shooting from after dark so that I don’t have to mess with my gear in my location later. I love knowing exactly where and how I will be creating the image after dark.
In the final image below, you can see that I waited until it stared to look yummy…. when things were looking beautiful and from the exact same vantage point from hours before. I set up my tripod once again with my cable release and this time with my 16 to 35 mm lens set at 25 mm, I timed how long it would take the cars to go from one edge of the bridge all the way to the other and out of my sight. It ended up being close to 15 seconds so I set my shutter speed to 15 seconds and then my f/stop to f/22 but I also changed my ISO to 50…to get the least amount of noise as possible from my camera. It was actually almost impossible to get cars going in separate directions at the same time since there was such little traffic on this bridge on this particular night. So, I shot cars going in one direction, away from me and capturing their taillights and then I shot the other shots with cars coming towards me with their headlights. Then later in Photoshop I layer masked two shots together, one with the cars coming and one with the cars going. This was exactly what I wanted although capturing just car taillights would have also worked very nice but I did want to try and get cars coming and going.
Images like this are fun and a great way to push your photography skills as shooting after dark can be much more difficult than shooting during the daytime…… but it can be incredibly more rewarding! I hope that many of you get to try shooting different things after dark as it really opens up whole new world for your photography!!
Great post! It was nice to see your posts pop up on my feed this week. Keep them coming…
Hey Glenn,
just redid my blog to a new look ….happy you like!! Car trails is such an awesome thing to do…..I am so addicted!!!!
scotty
Hi Scott-
Love this post and your photos. I also like the new look of your blog. Much easier to follow and read. Hope all is well….
Amy
Thanx so much Amy! Having a blog is work..but hoping it helps out people to try more things!! Will miss you both our next workshop to the Palouse!!
scotty
Appreciate these photos and thanks for sharing some of these good ideas. If you love bridges, try Tokyo.
I have shot in Tokyo. Absolutely love it over there Tom!! thanx for writing….
scotty